Any time is the right time to tap into your creative side and make fun craft art. If you want to take your scrapbooking game to the next level, this explosion box project and the scrapbook layout are a great way to spend some free time. These are versatile projects because you can do them with any theme. The explosion box combines memory-keeping, stamping, scrapbooking, gift-giving, and journaling. On the other hand, the scrapbook layout is simply a canvas that will frame your photos. These Zoo Adventure projects are a great way to celebrate your latest trip to see your favorite animals.
It’s easy to see why so many love the Zoo Adventure collection. Though these fantastically detailed projects may seem intimidating, you can handle them. You need the right supplies and directions. Our friend and seasoned crafter Cindy Velasquez provided a list of materials with instructions for making these designs come to life.
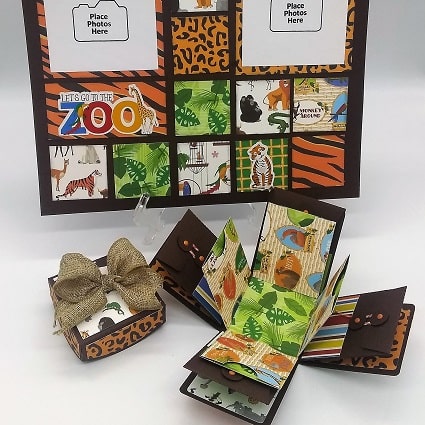
Zoo Adventure Explosion Box
Cindy combined dark colors and vibrant ones with delightful patterns, making the box an explosion of bold fun. The 3D explosion box was created using a Silhouette CAMEO cutting machine with the Silhouette Design Studio (the artist is Lori Whitlock). You can find it on the Silhouette website. There are other designs to choose from, too.
Zoo Adventure Scrapbook Layout
You don’t have to do it exactly as Cindy did it. You may not have Ranger ink, so do the best with what you got. That’s the best part of being a crafter. You have got to get creative to make your crafty ends meet!
Supply List
- Patterned paper from Carta Bella Zoo Adventure
- One sheet of brown solid color cardstock (layout base)
- Liquid glue (we have various glue and adhesive products)
- Ranger Distress Ink, Black Soot
- Ranger Ink Blending Tool
- Paper Trimmer
- We R Memory Keepers Laser Square and Mat
- Brads
Directions
Use these instructions with whatever collection you want!
- Pick your paper that you will use. I picked Carta Bella Zoo Adventure.
- The brown solid cardstock will be your base and will be cut to 12” x 12”.
- Cut the following papers to these sizes:
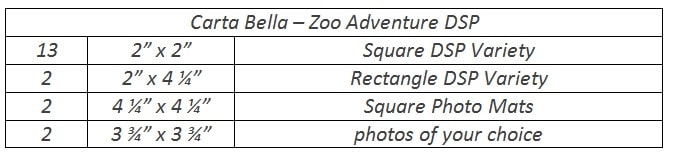
- After cutting the paper listed above, place the papers shown on the image over the brown solid cardstock.
- Place the project on your laser square and mat.
- Using the Tim Holtz Distress Ink in Black Soot with an ink blending tool, add ink to each paper’s edges.
- Once every paper piece has been inked, turn your laser on. Starting on the bottom right corner, line the right lasers 1/2” from the bottom up. Then line your top laser 1/2″ from the right in. This will create a crosshair mark on the bottom right. Add liquid glue to the first 2” x 2” DSP and adhere to the bottom right crosshairs mark.
 Move the right-side laser past the adhered paper about 1/8” and adhere the next 2” x 2” square.
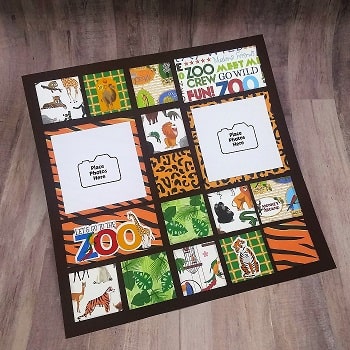
- Continue this process until the entire page is complete, as shown in the image. You should end up with approximately 1/2″ around all the cut pieces to the edge of the 12” x 12” solid cardstock base.
- Adhere the “Let’s Go to the Zoo” title sticker from the sticker sheet on the rectangle under the 4-1/4” square photo mat.
- Adhere the camel tag on the top square and add a tiny brad.
- Adhere the tiger sticker on the bottom right square.
- Cut two photos to 3-3/4” x 3-3/4” square and adhere to each photo mat.
- Now your Zoo Adventure layout is done and ready for display!
Show Us Your Zoo Adventure Projects
We hope that you will have as much fun doing these projects as Cindy did. Here at CraftDirect, we offer a wide variety of products you can use to make your preferred projects. The possibilities are literally endless when you combine your creative mind with our huge inventory of inspiringly delightful products.