by Richelle Naegle
It’s been a while since Cricut released a new cartridge, but they started out 2016 with a great new option. The All Occasion Box Card Cricut cartridge offers you wide application for a series of events.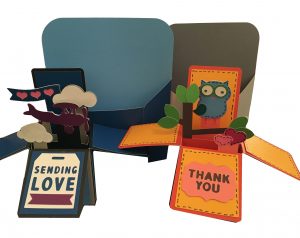
I just moved, and my craft room isn’t in decent shape yet. Nevertheless, I pulled out my Explore system, grabbed some craft paper and glue, and got to work. Who wants to organize a room when there are new card designs to make? Unfortunately, this meant I didn’t have all my favorite patterned paper at my disposal, so I went with plain solids.
It’s OK because I have 28 designs left to try, so I can get more creative with my paper later.
Sending Love Card
I made the Sending Love card and Thank You card. In case you don’t know, I love owls. I sized both of the cards to 16″ width using the Explore Studio. This left me with cards that, when flattened, are about 4″ x 4″. They are pretty small. You may want to make them larger—choose your own destiny.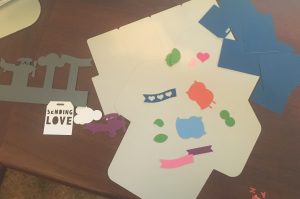
To start, I will give you all the tips I would have found useful before starting:
- Use your Explore scoring stylus
- Fold everything before you start gluing things down. For parts like the plane and clouds, the middle section is actually on the backside. If you glue first, you will have to re-do them—I can tell you from experience.
- If you want to do the stitching or add stickles, etc., I would do it before you glue the card together. It’s not easy to add after the fact when you have this type of card.
Here is a view of my pile of cut-out shapes. It may look intimidating, but it’s not so complicated once you get started.
Assembling the Card
Please forgive me; I took pictures all along the way, but some are of the Thank You design, and some are of the Sending Love, meaning there is a little inconsistency in the images (but I bet you can figure it out). The cards are similar, so the other will be a breeze once you do one.
I started here and folded along all the score marks, going back and forth. I started with the back image, so on the Thank You (below), the owl is in the back, and then I worked my way around.
The owl is in the back, the branch is in the middle (this will reveal the back of your paper), and then the hearts are in the front. Now you can see where everything starts to glue together for this section!
If you add extra faux stitching, this is when you would do so (or embellishments or anything else; I would adhere to them at this point).
Then, you should fold the box together (this is actually super easy and goes together quickly). I recommend using good adhesive tape for this part, just to make sure it holds together well. When the box is all together, you can see where the first section is inserted.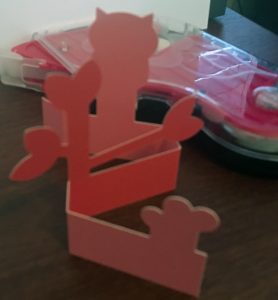
Now, you are ready to glue your pieces together. Here is a photo of where I put the glue—it’s the places that touch the box. This enables the card to fold, which is pivotal if you are mailing it or want it to fit inside an envelope.

Here is a view from the top of how it looks. As you can see, I also used a foam dot between the clouds so that it would stand out a little more than the rest.
That’s it! You are done.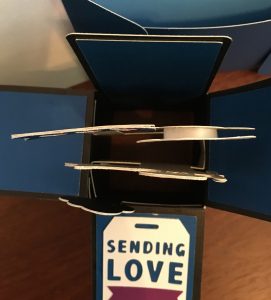
Remember to always have an extra Cricut machine blade in case yours dulls.
Thanks a Bunch, Flower Box Cards
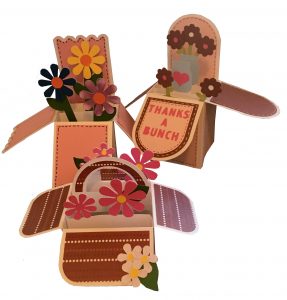
Let’s start with the one that says thanks a bunch. I made this one so that it is 6″ tall, which makes it a pretty good size. The last time I made these cards, they were smaller, and while they are fun that size, I wanted to make a card that was larger this time.
The second card is the one with three flowers. This one has a get-well sentiment; I just left that off. Use the Explore to draw a phrase like Happy Mother’s Day or something like that. I wish I had thought of that before I finished the card. It’s okay; I’m sure I have a Sizzix stamp that I could use to add something to it. This card was cut out to be 5.5″ tall.
Share Your Projects
The last card turned out to be like a basket. Instead of having the tall back like the others, all four sides fold down, and the handle is in the middle. I think it’s adorable! I love how this card turned out. This card stands 2″ tall when it’s all folded up and is more square than the other two. Be sure to save all types of Cricut materials. These fun cards could be used to make a beautiful card for your mother this Mother’s Day! Have you had a chance to use this cartridge yet? Have you made any Mother’s Day cards this year? Share them with me on our Facebook Page or our Paper Crafting Fanatics Page!
Happy Creating, and don’t forget to download our 2016 calendar.
Comments are closed.