by Richelle Naegle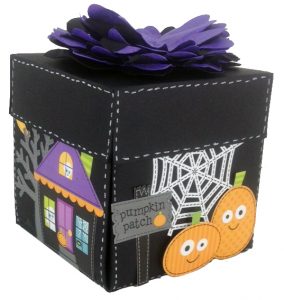
It’s officially Halloween so I hope you are ready to craft! You can decorate whenever you want, but I always wait until October 1st….so I guess I got ahead of myself this year. This project takes a little longer to make than most of my undertakings and requires a little bit of patience, but it was so much fun and I absolutely love how it turned out. Everyone seems to love it and I keep getting questions about how I did it, so I decided to make an exploding box tutorial. In all honesty, it wasn’t as hard as it looks and once you get going on it it will come together beautifully.
Supplies you need:
- Cricut machines or other die-cutting machines such as the CAMEOs. If you are using the Baby Bug or Portrait machines your box will be smaller it will work just you will have a really small box.
- Mini Books cartridge
- Flower Shoppe cartridge if you want the flower on the top. There are also a lot of other cartridges you can use to create a flower.
- Cricut Portable Paper Trimmer
- CGull scissors (green) – I used the CGull ones they are small and seemed to work better for this smaller project.
- 5 Sheets of paper for the panels and box lid. I used the October 31st Essentials Page Kit from Doodlebug Design
- Your own fun Halloween pictures
- Extra embellishments – the paper kit has some great embellishments in it, so you don’t need more but you can always use more
- Your favorite glue – I suggest a liquid and an adhesive runner
- We R Corner Rounder
 Creating the box:
I cut my box out of a nice black colored cardstock at 11″ so that it fits nicely on a 12″ x 12″ sheet of paper. Each section will require its own sheet of paper. I used the Cricut Explore on the lid. I’m not sure if it’s user error but I kept getting a very large lid that didn’t fit the box. (Pro tip: if you’re going to fill your box as much as I did, you need to make your lid a little larger than the box. The 6.5″ I did was just right.)
Hopefully, that saves you some time, cause I sure wasted some of my own : )
 Tips I found out (some the hard way):
- Decorate all your panels before you glue them into the box.
- Now you can order pictures that are 4″ x 4″ from a lot of major photo printing places – this makes it easier to cut down your photo’s to size
- Using a paper kit made it so much easier (I didn’t have to worry about if things were going to match or not) everything just fits together.
- If you are doing faux stitching, do it before you glue your box together
- Add pictures as you go, it’s harder to get the pictures in after the box is together or even after the embellishments are glued.
Then comes the fun part of this project: decorating and embellishing. There really isn’t a right or wrong way to do it. I just used my paper trimmer and cut a bunch of squares to 3.25″ x 3.25″. which gives me just a little bit of black edge around each one. Most of my pictures were cut at about 3″ x 3″, or a little smaller if I could get away with it. The Doodlebug essentials kit seriously made it easy. I used some stickers for the outside of the box and still had plenty to embellish pages on the inside. It had some ribbon as well as a lot of cute border stickers to embellish pages.
Finishing Touches
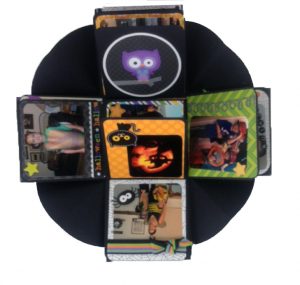
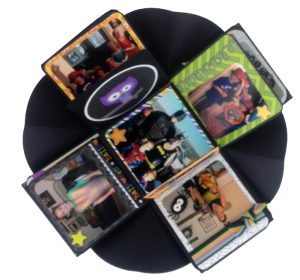
If you are using all three inserts, doing both sides, and decorating the inside of the box you have 20 sides to do in all! You don’t need a picture for each one, you can just put fun embellishments on it, or if you are using the Doodlebug essentials kits it has fun little cuts that you can trim out to embellish it.
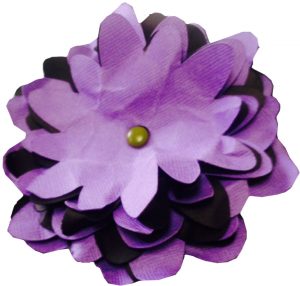
For the flower on the top, I used the Flower Shoppe Cricut cartridge, with the largest flower being 4″ and then went down in increments of .25″ all the way down to 2.25″, with a total of 7 flowers. Then to give them have a little more life, I used a spray bottle and then crumpled them up and unfolded them (but don’t straighten them). Then just let them dry. It gives your flower a great dimension without a lot of work.
Share Your Projects with Us
OK, so that’s about it! This project does take a few hours, I think it took me about 3 but that includes a lot of time for cutting the lid, and re-doing it. I hope you have enjoyed this post. Now hopefully you know how to make an explosion box with your own personality and flavor. It wasn’t as hard as it seemed when I was watching help videos.
If you make one or have already made one PLEASE share it with me I would love to see what you have created. Post in on our Google Paper Crafting Fanatics page I can’t wait to see what you have created. If you are looking for cartridges for this project, try our Halloween Cricut cartridges.
Happy creating!