by Richelle Naegle
I consider myself to be a “cute” scrapbooker, meaning that I am drawn to designs you might refer to as adorable shapes and vibrant, bright colors, particularly pastels, which is why Easter is one of my favorite holidays. I think the fact that I have kids is one of the reasons I’m so partial to cute designs. When I’m making a layout for my boys, cute designs are typically better thematic matches for my photographs and memories. Or maybe I’m just a big kid at heart, either way, I feel like I am #winning.
Happy Easter Layout
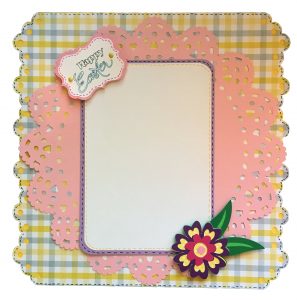
So for this first layout, I thought I would change the pace and go for a more classic look. The background for this layout is from the Elegant Edges Cricut cartridge. It only has the scallops on the one side, so I added two of them and welded them together. Dimensions = 11.25″ x 11.25″.
The circle doily is from the Edge to Edge Cricut cartridge and was cut out at 11″. The flower (4″) is cut from Kate’s ABCs, the final piece is the tag and it is is also 4″ and the Happy Easter was drawn on using the Cricut Explore. Just added a little bit of faux stitching and that’s it! I really enjoyed making this layout, and I just couldn’t stop there. I had to make myself something cute, too…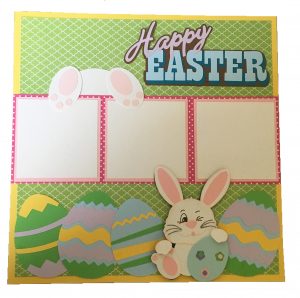
…so I went with this darling rabbit and made another fun Easter scrapbook layout. This one took a little more time than I’m used to. I started out with my Cricut machine but then ended up using the Silhouette CAMEO, as well.
I just couldn’t find the perfect bunny on any Cricut cartridges (Cricut does have a lot of cute bunnies, though) and I when I was running through some Silhouette images, I immediately fixated on this little guy.
I guess that’s why some people own both electronic cutters – you get the best of both worlds! If you only have one or the other, no big deal, they are both great machines. You can make do with just one electronic die-cutting machine.
If you have access to Silhouette designs, they have some very cute eggs and Happy Easter phrases that you can use, or if you craft with Cricut, you can find a cute bunny to sub in (try the Create a Critters cartridges).
This layout has so many components, I thought a boring list of bullet points would be the best way to go over the details:
- The Eggs: Easter Magic are cut at 3.75″ each
- Happy Easter: Easter Magic at 3.00″
- Bunny Backside: Is just made up of shapes Bum
- Bum: 3.50″ circle
- (2) Feet: 2.25″ oval
- (6) Toes: 0.30″ circle
- 12″ x 4″ stip
- (3) 3.75″ squares
- (3) 3.50″ squares
- Bunny is 5.00″ and is called Bunny w/ Large Egg in the Silhouette Design store (his eyes are stamped).
Easter Cards
Finally, I made a few quick cards that were mostly created with scraps of material! I always have small amounts of beautiful craft paper and it’s hard to find uses for them. Well, this is where you use those! These are all 4″ x 4″ cards. Various cartridges give you an option to cut blank cards or (Pro tip) you can just use a 4″ x 8″ rectangle, score it in half, and now you have a card.
When the machine comes into play, you need to attach the bunny, or egg, or whatever simple image you are using for the card so that when it cuts, you will be left with a silhouette of the image. If you are using the Cricut Explore, don’t forget to add a scoreline.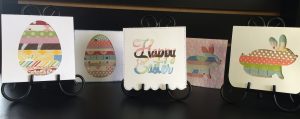
When I say a simple image, I mean shapes without much detail. I used the Holiday Cakes Cricut cartridge for these cards. The bunnies are cut at 2.71″, Happy Easter at 2.30″, and the Eggs at 3.35″.
Now for the fun and easy part! Gather all your tiny scraps we talked about and cut them into about 3.50″ lengths and whatever width you want (I didn’t measure mine – I just started cutting them out). Then, glue them to about a 3.50″ x 3.50″ square piece of paper. Get creative: you can overlap the materials or do whatever makes you happy! Once you have the 3.50″ square filled up adhere to the inside cover of your card. That’s it! It’s seriously that easy!
Finishing Up
After I made the first three cards, I couldn’t stop! So, I made a few more and added some fun easy embellishments to them. If you are looking for ways to add a little something extra, here are some of the easy quick embellishing ideas I include to make them stand out more:
- emboss the card
- emboss the strips
- add some ink around the edges
- Sparkle Lightz
- faux stitching
- buttons
You get the picture. You can add just a little bit to these cards and end up with a lot of character!
Happy Easter, Passover, and creating!